
Engineering the Physical Touchpoint: 6 Pillars for Better Silicone Keypad Integration
In the field of industrial design and automation, the HMI (Human-Machine Interface) Engineer serves as the primary architect of the interaction between human operators and complex systems. It is a field that often doesn't get much coverage and is, in my opinion, one of the lesser-appreciated disciplines in the engineering world. Often, people only hear "HMI" in the context of industrial machining when someone is simply "putting a screen on something." In reality, when applied correctly, the profession has a much wider breadth. It is a comprehensive discipline that blends software, electronics, and human factors engineering to bridge the gap between human capabilities and industrial processes.
Oddly enough, in this situation, we are going to be looking at the things that cover buttons—specifically silicone—and really dialing in the best way to integrate them into our various hardware projects. Personally, Mekoprint has done an excellent job in calling out best practices, so I want to link out to their HMI Design Guide for Silicone Rubber Keypads, which I personally use when designing out items. I am not planning to write a full white paper or a standalone design guide, but I will reference a couple of key points from their work and others as we go along.
1. Establishing Structural Foundations
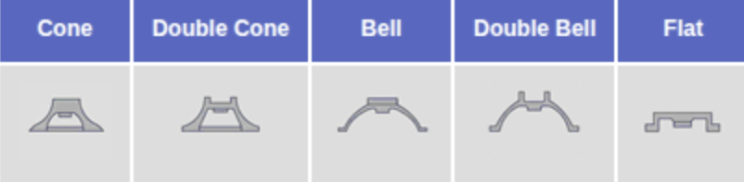
The performance and reliability of a silicone keypad are dictated by its initial architectural layout. While designers often focus on the surface, they frequently overlook the critical interactions occurring on the underside. Designs tend to oscillate between hollow voids and solid masses, yet the bottom geometry often influences functionality more than the top. In practice, structural support is defined by how the button integrates with the plastic housing or the PCB. Unfortunately, many projects prioritize the aesthetic button-to-board interface over the functional board-to-button assembly—a fundamental oversight that inevitably surfaces during physical testing.
Because we work so closely with the underlying electronics, selecting the right tactile switch is half the battle. PCBOnline has an excellent guide to buttons and their selection which I recommend so I don’t have to retread the context they’ve already outlined so well.
Within this structural phase, Shore hardness (durometer) plays a critical role in the button process. Getting this wrong by even a couple of degrees either way can lead to disaster; the button may either gradually fail over time or fail dramatically with no immediate recourse for resolution except for a total product recall. This material specification directly affects the "web" resistance and the longevity of the actuation point. If you need help understanding the intricacies of the shore hardness problem, check out our dedicated article: Selecting the Right Silicone.
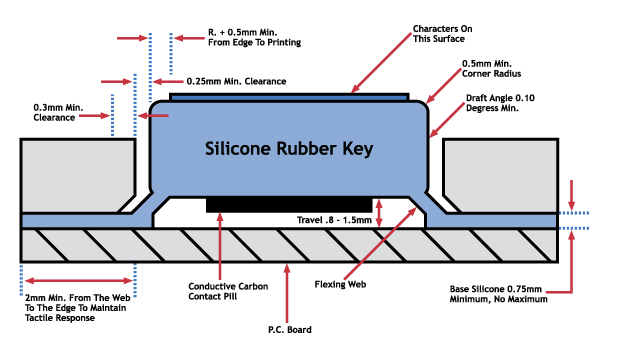
Pre-Layout Geometry: It is critical to define the keypad size, spacing, and available enclosure geometry first, as these parameters set the hard limits for button layout and tactile performance.
Wobble Prevention: For smaller keypad areas, adding 1 mm thick silicone support walls around buttons improves stiffness and prevents lateral instability or "wobbling" during actuation.
Web Engineering: The "web" is the thin area of the silicone that allows for movement. In compact layouts, utilizing a combination of top and bottom webs can optimize flexibility and tactile response.
Thickness Standardization: Engineers should aim for a button thickness between 3 mm and 5 mm to maintain a consistent feel and prevent the user from feeling the underlying switch or metal dome.
Base Membrane Specs: The web is typically 0.5 mm thick, though this varies based on the silicone hardness (durometer) and the overall layout requirements.
2. Optimizing Tactile Ergonomics
The "feel" of a switch is a vital engineering metric for ensuring user confidence and minimizing operation errors. While the structural foundation ensures the button works, ergonomics ensure the user knows it worked—a feedback loop that is essential in high-stakes environments where an unconfirmed press can lead to system failure.
As HMI Engineers, we must be increasingly mindful of how buttons are being used and what the true intent of the interaction actually is. Recent industry shifts have shown a significant backlash against the overuse of touchscreens, particularly in the automotive sector. Brands like Volkswagen and Hyundai are returning to physical controls after realizing that burying essential functions in menus causes dangerous driver distraction. You can read more about this shift in the Wired article: Why Car Brands Are Finally Switching Back to Buttons.
This trend emphasizes that the physical button serves as a critical safety feature; it allows for "eyes-on-the-road" operation through muscle memory and tactile confirmation that a touchscreen simply cannot replicate. When we design the tactile profile of a silicone keypad, we aren't just making a button—we are providing the definitive haptic feedback that confirms a command has been executed without the user needing to visually verify it on a display.
Blind Navigation through Shape: Incorporating varied shapes—such as concave, convex, or raised borders—allows operators to identify functions by touch alone, which is vital for maintaining focus on the primary task.
The "Anatomy of a Click": Engineering the "click" requires balancing four specific factors: Actuation Force (pressure required), Travel (distance moved), Snap Ratio (suddenness of the tactile drop), and Audio Feedback (the sound of the contact).
Tactile Stability: Taller buttons supported by internal walls generally provide more definitive tactile feedback and mechanical stability than thin, unsupported designs, which can feel "mushy" or imprecise.
Thickness and Feel: Maintaining a button top thickness of 3 mm to 5 mm is recommended to ensure a consistent feel and to prevent the user from physically "feeling" the mechanical edges of the metal dome or switch underneath.
Standard Snap Ratios: A standard tactile snap ratio for silicone keypads typically ranges between 40% and 60%; dropping below this range often results in a "linear" feel that lacks clear user confirmation.
3. Engineering Precision Backlighting
Effective backlighting is a balance of lumen efficiency and light containment. Often, when we design buttons, we are only focusing on the feel or the ability for it to snap back in place. We don’t really give the time of day to how a button interacts in different environmental settings or its ability to quickly call a human’s eye to a specific section for an action or resolution. In all my years of action, I’ve found that almost no one brings up backlighting in silicone, even though it can prove to be a massive improvement on the overall HMI.
Silicone rubber is an excellent natural conductor of light. However, without proper engineering, you end up with "hotspots" and "light bleed" that make a professional device look like a cheap toy. Lighting is rarely just about aesthetics; it is a functional requirement for low-light operability and user guidance.
Manage Light Diffusion: Adjust silicone translucency using milky-white pigments to reduce hotspots and improve light distribution across the key surface.
Utilize Light Blocks: To prevent light "bleeding" between adjacent symbols, engineers specify molded, solid-color silicone light blocks (vertical inserts).
Space for Stability: These light blocks typically require 1 mm for the block itself plus 1 mm of clearance on each side to maintain silicone structural stability.
Strategic LED Placement: Position LEDs to the side or further away from the window to achieve a more uniform glow; moving LEDs sideways is often more effective than simply increasing material thickness.
Light Guide Film (LGF): This technology uses top or side-firing LEDs to distribute light through a thin film across the entire keypad, significantly reducing power consumption and the number of LEDs required while maintaining uniform brightness.
Fiber Optics: For ultra-slim designs, a flexible fiber optic layer can be incorporated between the circuit and the silicone, allowing the entire surface area to be evenly backlit.
Prototyping Iterations: Lighting often requires several prototype iterations to fine-tune the balance between pigmentation levels and LED positioning to achieve the desired visual result.
4. Advanced Artwork and Sealing
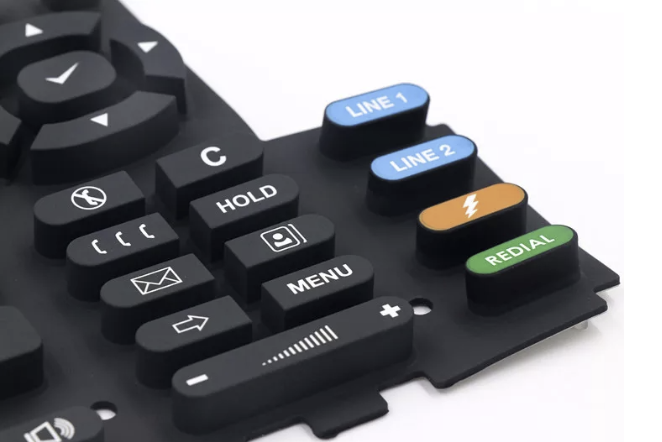
The efficacy of an HMI is often judged by its legibility and its ability to survive the environment it was designed for. In my experience, artwork and sealing are frequently treated as "finishing touches," but from an engineering perspective, they are fundamental to the device's lifecycle. We can’t always be super precise in button layout, and sometimes additional context needs to be added or even some "flavour" for the design. Many engineers end the process immediately after the moulding is done and don’t even broach the idea of having anything beyond it—even when we see commercial products like DeWalt radios commonly using secondary artwork and textured finishes to define the user interface.
Precision in Labeling: While screen printing is a common standard for flat surfaces, it is generally limited to those areas because the process cannot reach curved or angled sides.
Laser Etching for Contours: Laser etching is the superior choice for complex shapes, as it removes paint layers to reveal symbols with higher precision and durability.
The Dead-Front Effect: For a modern aesthetic, engineers can utilize laser etching to create "hidden" symbols that stay invisible until the internal backlighting is active.
Integrated Sealing Gaskets: To achieve high ingress protection (up to IP67), engineers can design a molded gasket into the keypad which provides a robust waterproof barrier when compressed.
Sealing Lips: For designs requiring flush-mounted buttons, an integrated sealing lip around the outer edge creates an effective barrier against water and dust.
Adhesive Integration: In tight footprints where mechanical compression isn't possible, using a 5mm adhesive gasket can create a permanent, waterproof bond to a flat surface.
Design Iteration: Achieving the right balance between artwork clarity and sealing performance often requires several design iterations to ensure the best overall result.
5. Protective Coatings for Longevity
In the lifecycle of a hardware product, the surface of a silicone keypad is the most frequently abused component. Silicone is naturally porous and has a high coefficient of friction, which makes it a magnet for dust and prone to "stickiness". From an engineering perspective, a coating isn't just an aesthetic choice—it is a functional necessity to ensure the interface doesn't degrade after six months of field use.
Most engineers are surprised to learn that raw silicone can actually be damaged by the very oils on a human hand or common cleaning agents used in medical and industrial environments. Without a protective barrier, your artwork and the material itself are on a countdown to failure.
PU (Polyurethane) Coatings: These are the industry standard for enhancing the abrasion resistance of screen-printed or painted legends, providing a "matte" or "gloss" finish that ensures icons remain legible over hundreds of thousands of cycles.
Parylene Coatings: Essential for medical, aerospace, and military-grade applications, Parylene is applied via vapor deposition to create a pinhole-free, chemically resistant barrier that protects the keypad from moisture, gases, and aggressive solvents.
UV-Resistant Coatings: For any HMI used in outdoor settings, UV-stabilized coatings are critical to prevent the silicone from yellowing, "chalking," or becoming brittle due to prolonged sun exposure.
Anti-Dust/Epoxy Coatings: Specialized coatings can be applied to reduce the natural tackiness of silicone, preventing dust accumulation and providing a smooth, premium feel that mimics plastic.
Chemical Compatibility: When selecting a coating, it is vital to test for compatibility with the specific cleaning agents or chemicals the device will encounter in the field to avoid delamination.
Tactile Impact: Engineers must account for the fact that thick epoxy or heavy coatings can slightly increase the actuation force required, potentially altering the carefully designed snap ratio of the button.
A Unified Approach to Better Silicone Design
Successfully integrating silicone keypads into a hardware project requires moving away from the "siloed" engineering approach where the enclosure, the PCB, and the interface are treated as separate problems. To do silicone better, the development team must treat the HMI as a singular, cohesive system where the board supports the button, and the button protects the board.
This "board-to-button" philosophy ensures that structural stability, Shore hardness, and tactile feedback are aligned from the first prototype rather than being corrected after a failed field test. By referencing established standards like the Mekoprint Design Guide and leveraging advanced technologies like LGF or Parylene coatings, engineers can transform a simple rubber cover into a high-performance, durable interface that stands out in a market otherwise dominated by flat, distracting touchscreens.
Ultimately, the goal is to stop treating the keypad as a finishing touch and start treating it as the primary physical bridge between your machine and its operator.
About Landi Industries We help teams navigate the complexities of product development by sharing the hard-earned lessons of hardware engineering. From structural design to system architecture, our goal is to provide the roadmap for turning ambitious concepts into reliable physical products.
Stay in the Loop:
The Landi Handbook (Beehiiv): Our primary deep-dive newsletter for tactical engineering advice and hardware development strategies.
LinkedIn Newsletter: A medical-focused newsletter breaking down complex technical topics for non-technical professionals and stakeholders.
YouTube: Visual guides and technical walkthroughs covering the realities of the product development process.
Medium: Long-form articles exploring the deep "why" behind successful hardware and system design.
Work With Us: Need expert help with your next build? See our full range of services at LandiIndustries.com